Video production technologies have have improved drastically since I produced my first community vlog 6 years ago. Armed with a DSLR and a laptop, young YouTubers are now creating amazing content rivaling large studios. With this low barrier to entry, there’s never been a better time for community managers to utilize online video as a way to increase engagement.
Recently, one of our Hong Kong based community super-users came to the Bay Area for our company’s sales kickoff. This was a great opportunity for me to get him on camera for a user spotlight video. Brian has been a cornerstone of our community for many years, and I knew all of the community members he has helped would love to meet him “virtually” via a personable video interview. There are, however, a number of challenges I had to work with:
- Outside of the sales kick off sessions and business meetings, Brian’s free time was severely limited. I was only able to book an one hour slot on his calendar.
- Although we’ve exchange a few emails on interview questions, I did not have a chance to rehearse the interview with Brian. This was going to be a live discussion captured on camera. Once my hour is up, that’s it. Whatever I am able to capture on camera will be what I have to work with.
- I do not have the budget to hire a video producer for this type project. I had to handle the entire production process myself: from pre-production all the way to post.
- I can not dedicate a lot of post production time to this project. On top of my community management responsibilities, I am managing several large web project as well. I need to be very efficient with this project, and it can not turn into a time sink.
After all’s said and done, the final video was posted 3 hours after I’ve setup the camera. Although it is definitely not the most professional video work I’ve done, I feel that it is something that’s “good enough” for its intended purpose.
Here's how I did it.
Equipment List:
Olympus OM-D EM-5 Body
Olympus M. Zuiko Digital ED 12-40mm f/2.8 PRO Lens
Oben AC-1321 Aluminum Tripod with BA-106A Ball Head
Olympus EMA-1 External Mic Adapter
Realistic Condenser Lavalier Microphone
Tascam DR-05 Audio Recorder
Mini Tabletop tripod
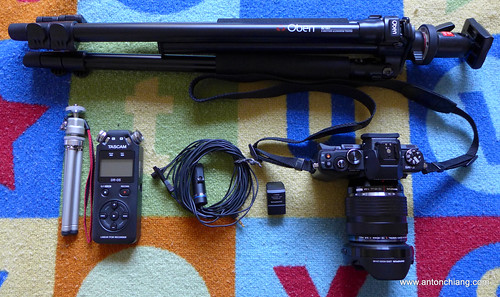
I’ve recently bought the EM-5 in order to have a lighter interchangeable lens camera. Although I still love my Canon 7D (and its many lenses), it’s not the easiest camera to travel with. The EM-5’s 5-axis image stabilization system makes it easy to shoot handheld, and its small size makes this one-camera interview kit extremely portable.
The 12-40mm f/2.8 lens is the “L” lens of the Micro Four Thirds world. It’s an extremely high quality lens for both video and still photography. The large f/2.8 aperture is a must to get that shallow depth of field film look. It is weather sealed just like the EM-5, and it makes for an excellent walk-around lens when traveling.
Nothing makes a video feel “amateurish” more so than terrible audio captured with the on-camera microphone. For interviews, my 10 year old Realistic condenser lavalier mic still provides better audio quality than any on-camera microphones ever could. I consider audio for video a critical part of any videos worth capturing, and the Tascam DR-05 was set up on the desk in front of Brian as a backup (just in case something goes wrong with in-camera audio capture).
Lighting:
Lighting:
Most offices have fluorescent lamps that look horrible on camera, and this office was no exception. With limited choices in locations, I was lucky enough to find a large office with a glass wall that allowed diffused natural sunlight to come in. This was not the best lighting solution, but with my limited time and resources, it was simply not feasible to bring in and set up a three point lighting kit. Having said this, lighting is the first area I would seriously consider improving in future shoots.
Production Process:
To make Brian feel more at ease, I simply rolled the camera and started talking to him. I had to pay very close attention to what Brian was saying, and repeat the question if his response was unusable even with editing. This was a delicate process since 1. my time was limited and 2. the more you make your subject repeat, the more nervous they tend to get. For folks who do not have formal media training, talking into a camera can be a nerve wrecking experience. Filler words such as “ehs” and “ems” begin to increase in frequency when one’s self conscious in front of the camera. It can help to ask the subject to be conscious of not using filler words. In addition, developing a good rapport with the subject can also make the entire process less difficult.
Post Production:
Brian did fairly well for a completely unrehearsed and rushed interview. However, this still meant that the raw footage I got required some serious editing. I wanted to get the video posted as soon as possible, and I had to show Brian the rough cut before he left town. To expedite the process, I simply used the company PowerPoint template to create all titles and graphics. The entire raw footage file was dumped into the Final Cut Pro X timeline, and I simply cut the clip as I watched it for usable sentences and sound bites. I tried to keep the edits at a slightly fast pace (similar to the quick jump-cut style edit made popular by YouTube vloggers). At the end of the day, I think I was able to introduce Brian to our community in a way that’s infinitely more personable than a text interview.
Obviously, this is a fast paced “good enough” type of production process. If budget allows, community managers should always utilize video professionals to deliver the best results possible. Having said this, I highly encourage you to give the DIY method a try. It can be a rewarding experience for both you and your community. And with success, it may lead to something much bigger than a one-man show.